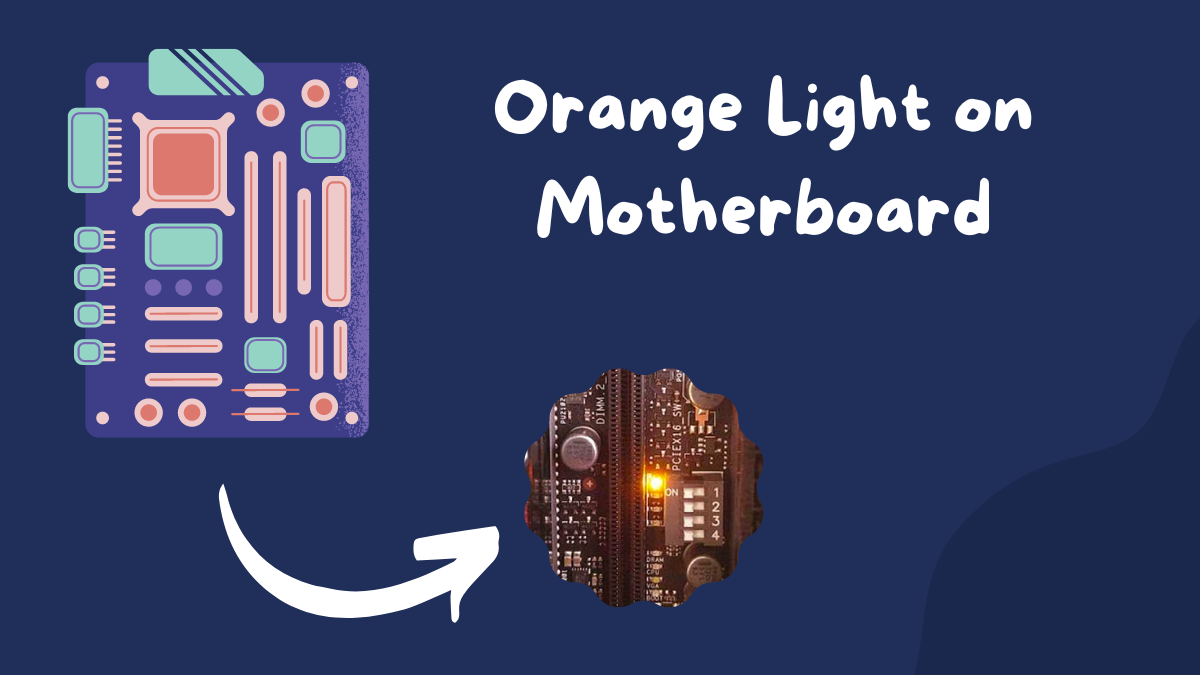
Orange Light on Motherboard [Easy Steps to Fix It]

The orange light on the motherboard indicates a failure in the computer’s operation and helps you figure out what’s causing the issue.
If the orange light is solid, there’s an issue with the RAM placement, RAM configuration, or another hardware part on your motherboard. But if the light is blinking, it indicates a faulty power supply.
In this article, we’ll find out what an orange light on the motherboard is, the types of motherboard’s orange lights, and how to fix the issue you’re facing using them.
Let’s dive in.
What is Orange Light on Motherboard?
Different motherboards have different methods for indicating an issue causing system failure. Some motherboards have a single indicator light that blinks or remains static or changes colors to indicate an issue. Whereas, others have multiple indicator lights for the same purpose – showing the status of different hardware parts on the motherboard.
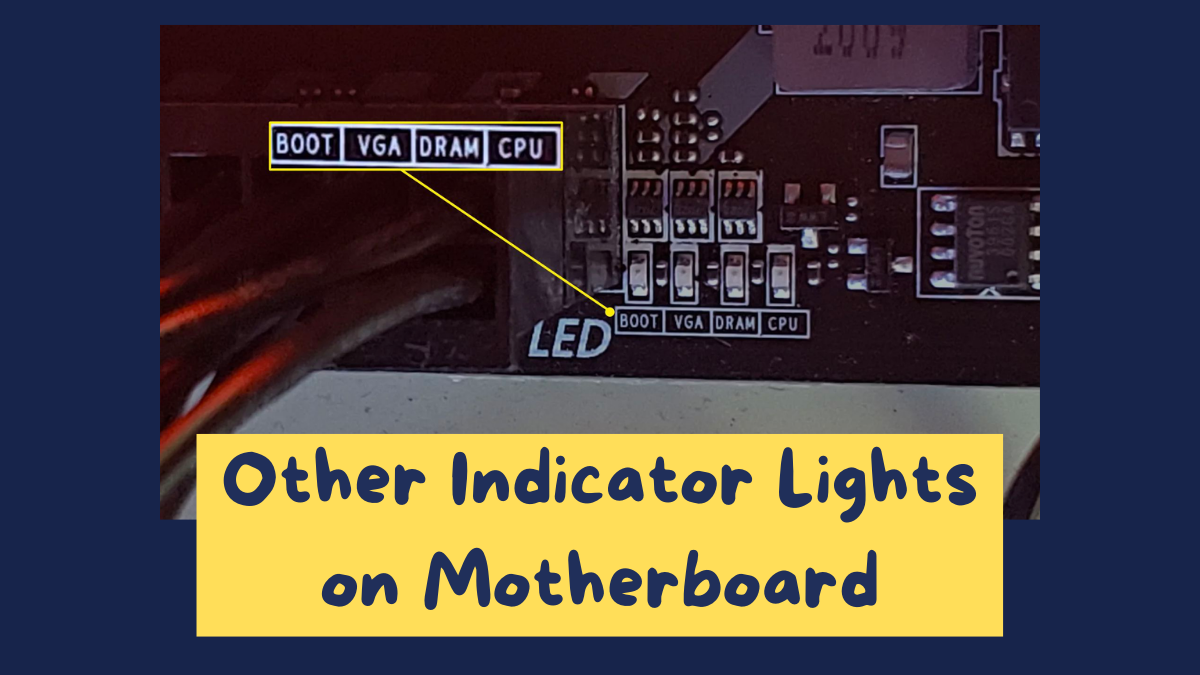
More often than not, motherboards have an orange light indicator that either remains static or blinks. Both these states indicate different problems for easy identification and troubleshooting.
Why is the Orange Light on My Motherboard Lit?
A lit orange light on the motherboard may indicate various problems, such as faulty hardware, a hardware installation issue, a program bug, an operating system malfunction, and so on. A computer only operates when all its main hardware parts and software are alright and compatible. An issue with any of those can cause the orange light to get lit.
Here’s a detailed overview of the different reasons that cause the orange light on the motherboard to glow:
Insufficient Power Supply
If your computer requires more electric power than the max output of your power supply, it won’t power up for the safety of hardware parts and the orange light will glow. Think of powering a system that requires 500W power on a 450W power supply (PSU). But you won’t face this issue unless you’ve modified the hardware on your computer.
Unstable Power
Power supplies have different efficiencies on a given load. The supplies offering at least 82% efficiency on a 20% load have an 80 Plus Bronze rating. If your power supply offers a lower efficiency than 80%, it may not offer stable power to the computer, causing it to shut down. It can also cause your motherboard’s orange light to glow.
Incompatible RAM
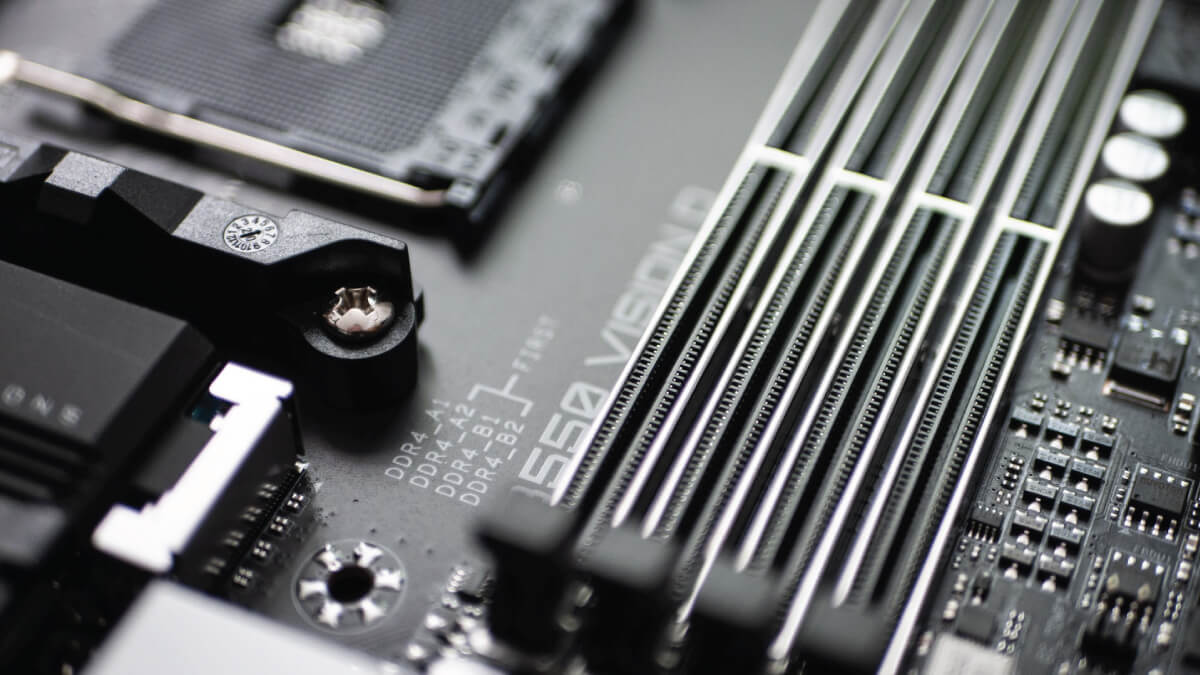
RAMs come in different generations (DDR2, DDR3, DDR4, etc) and have different clock speeds. The clock speed refers to how many times RAM can access its memory per second and is recognized as Mhz. If your computer has two RAM sticks of different clock speeds or generations, there may be an incompatibility issue stopping your PC from turning on.
Wrong RAM Installation
A common mistake many people make when installing RAM sticks is they install them too loosely. The RAM modules need to be pressed harder into the memory slot for their golden-color pins to align with the ones in the memory slot. When RAM sticks are not properly installed into your PC, they don’t allow your system to boot up.
Improper Placement of Hardware Parts
Like RAM, many other parts of your computer hardware can be placed improperly. For instance, your GPU may not have been installed into the right slot or it may not be installed as tightly as it’s supposed to be. Or, you may have forgotten to attach its power connector.
Since there are various possibilities, you should closely determine each hardware part and ensure they all are installed appropriately.
Tightly Placed CPU Heatsink
Many users keep tightening the screws when installing a heatsink on their CPU and end up over-tightening the heatsink. It causes a lot of pressure on the CPU and wipes away some of the CPU’s thermal paste, which can lead to overheating. Your PC won’t start if it’s suffering from overheating or if it finds out the heatsink is not installed properly.
Damaged Hardware
Your computer only boots up when all the essential hardware is working properly. If any of the hardware components on your motherboard misbehaves, you’ll likely see the orange light on your motherboard. In such a case, try finding which hardware part is misbehaving yourself or go to a repair shop and let a mechanic do that.
Short Circuit During Assembly

You see, human bodies conduct electricity to some extent. If your body conducts static electricity (by rubbing against carpet or such), be sure to discharge it before assembling your PC or touching its hardware parts to avoid short-circuiting. All you need to prevent short-circuiting is an anti-static wristband or an anti-static surface.
Damaged CPU
Like other hardware parts, your PC doesn’t start when there’s an issue with the CPU. Don’t head over to a repair shop right away. Instead, consider replacing the CPU’s thermal paste and cleaning the heatsink on your own, if you’re comfortable with it. Otherwise, feel free to opt for a mechanic.
Click here to check out our guide on the best motherboards for gaming under $200 to find yourself a decent gaming motherboard on a budget.
How to Fix Orange Light on the Motherboard?
Fixing the orange light on your motherboard can be tough. But you can get over this issue if you patiently look through the different potential reasons behind the orange light and identify exactly what hardware part is misbehaving. Here are two solutions for two different cases, static and blinking orange lights:
Solution for Blinking Orange Light on Motherboard
If your motherboard’s orange light is blinking, it indicates an issue with your power supply. In some cases, you might be able to fix the power supply on your own, without a technician.
First, unplug the power cable from your computer and remove the PC case. If your computer has a side panel, consider lifting the latch to open it. Sliding off the case is a good way around for PC cases with no screws. And the cases that come with screws require removing them to open the case.
The second thing you might want to do is smell a burning aroma from the power supply. If that’s the case, your supply has been fried out and requires a replacement. Otherwise, keep up with fixing the issue at home by spraying canned air on the supply. It helps remove any debris that may be keeping the supply fan from moving.
Once you’re done with cleaning, plug the power cable back in and see if the computer boots up now. If it still doesn’t, consider replacing your power supply. You order a power supply online from your existing model and replace them at home. Or, you can head over to the local market for your power supply replacement.
That said, many other ways are available to identify if the power supply is misbehaving, but they require tools like ohm meter and multimeter. If you have access to these tools, you can look into those methods as well, before replacing your power supply.
Solution for Static Orange Light on Motherboard
Static light on the motherboard indicates an issue with the system, rather than just the power supply. So, solving your motherboard’s static light can be a little more complicated, as it requires making sure various parts of your system are working fine.
But in most cases, static light is due to the misbehaving of your secondary storage, also known as permanent storage.
Whether your computer is running off an SSD or HDD as the secondary storage, start diagnosing the issue by removing the inner cables on your system connecting your HDDs, SSDs, or other optical storage drives.
Once you’re done, try turning on your PC with those cables detached and see if the PC tends to boot up (it can’t boot up properly, however, since the operating system is stored in the storage drive).
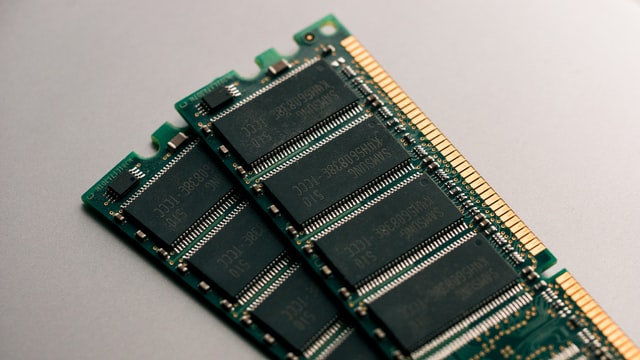
If the orange light issue remains, consider cleaning your RAM’s pins by rubbing its contacts with an eraser or by blowing canned air across them.
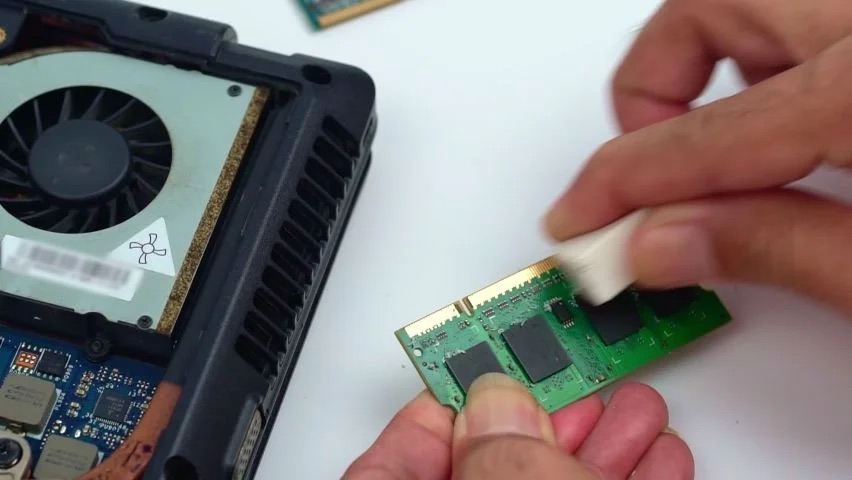
Source: Shutterstock
A better way to clean RAM is to dip a cotton swab into isopropyl alcohol, wait for it to dry, and then rub it on your RAM’s contacts. Once you’ve cleaned your RAM sticks, put them back into your motherboard and try turning on your PC (with storage drives detached).
Following these steps should fix the orange light issue on the motherboard.
Also, check out our guide on the best LGA 1200 motherboards to find yourself a decent motherboard that supports LGA 1200.
Other Ways to Fix Orange Light on Motherboard
You see, a computer is a complicated system made of dozens of hardware parts for proper functioning. Sometimes, identifying RAM, storage drives, and power supply for an issue is not enough to fix the orange light on the motherboard. Instead, here are some other ways to maximize your chances of getting over this issue at home.
Place RAM Properly
RAM sticks can only be placed in one way due to the gap in between the contacts. The gap must correspond with the gap on the connector for proper placement. Some users install the RAM sticks in the wrong direction, causing the pins on one side to remain up in the air. Make sure you’re not making that mistake.
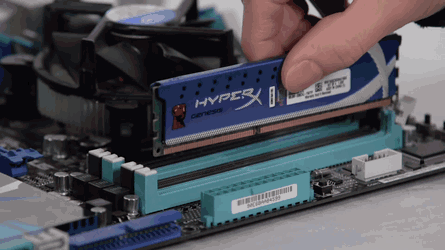
Source: Gfycat
Alternate Your RAM’s Configuration
Try installing your RAM sticks in a different order and see if the computer boots up now. If it still doesn’t, only install one RAM stick into the main connector and try booting up your system now. If the orange light issue is fixed, then shut down the PC again, reconnect the other RAM sticks, and see if the issue is fixed entirely.
Use Another Slot for GPU
PCIe slots come in different generations and sizes (even on the same motherboard). So, there’s a chance your GPU is not installed in the right slot. In such a case, consider installing it into an alternative PCIe slot and see if the PC works now.
Update Your Computer’s BIOS (Basic Input/Output System)
BIOS is an important program for any system as it helps initialize the PC hardware to load the operating system it contains. If the BIOS fails to work properly, the PC will be unable to execute the operating system, causing the orange light to appear. In such a case, go into your PC’s BIOS menu when starting it up, download the BIOS update, and install it.
Reset Your CMOS Battery
The CMOS battery in a computer is what powers the BIOS firmware. If your PC’s BIOS is misbehaving, resetting the CMOS battery is a great way around. All you have to do is disconnect all the cables from your system, remove the battery for a few minutes, and then reinstall the battery. That’s it – the CMOS battery will be reset.
Replace the CMOS Battery
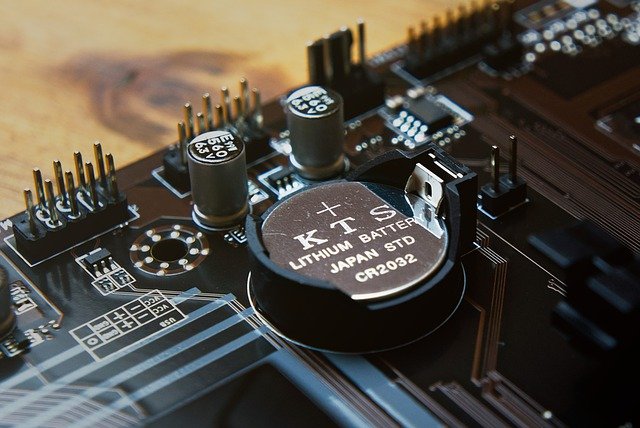
The CMOS batteries last for up to five years or more but not forever. When the battery runs out of charge, your system’s BIOS won’t load anymore, causing the orange light to appear. In that case, consider replacing your CMOS battery with a new one. They’re generally quite cheap – you can get a good one for around one dollar.
Apply Thermal Paste to the CPU
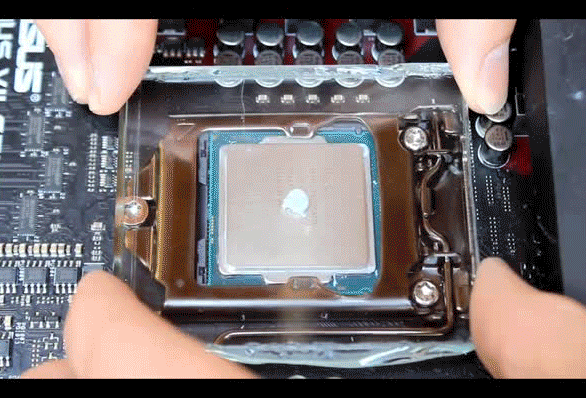
Source: LinusTechTips
If you’re using your computer for years without proper maintenance, it’s possible your CPU has started overheating and is not allowing the PC to start. In such a case, applying a thermal paste to the CPU is your best bet. All it takes is for you to detach the heatsink on the processor, apply some thermal paste, and reattach the heatsink.
Try a Different PSU
If you’re not sure whether your computer’s PSU is working fine or not, consider replacing it with an alternative one, temporarily. It would let you find out if the power supply needs a replacement or not.
Change Your CPU
The same goes for the CPU. If you have an alternative one available and know how to replace CPUs the right way, consider changing your CPU to see if it was causing the orange light to appear.
Opt for a Technician
Technicians charge for their experience and expertise. If you’re suffering from an issue for the first time, possibly they’ve dealt with it a dozen times before. So, heading over to a repair shop is always a good option if you want to save time and ensure your PC is handled professionally.
Other than that, the following video might be helpful in getting over the orange light on your board:
What If the Orange Light Issue Persists?
If you have tried all the above steps and the orange light on your motherboard persists, it could be an indication of a deeper underlying issue. In such cases, it might be time to consider replacing your motherboard.
Before you decide to replace your motherboard, you should consult with a professional technician to determine whether it is indeed the cause of the problem. A technician will be able to diagnose the issue and provide you with advice on what to do next.
If your motherboard is the cause of the issue, you should be prepared for the cost of a replacement. Motherboards can be quite expensive, so you should budget accordingly.
In addition to the cost of the motherboard, you will also need to factor in the cost of any additional hardware that may need to be replaced, such as your processor or memory.
Having reviewed dozens of motherboards on this blog, we believe the Gigabyte B550M motherboard is one of the finest options available. For an affordable price, it offers all important features like a PCIe 4.0 ready x16 slot, ultra-fast NVMe PCIe 4.0/3.0 M.2 slots, and support for 128 GB RAM. What else could you ask for?
FAQs
Here we answer the most popular questions regarding the motherboard’s orange light.
The dram light on the motherboard may be due to many reasons, like a bad power supply, poorly placed RAM, overheating CPU, misbehaving storage drive, etc. The best way to fix the motherboard’s dram light is by diagnosing the different hardware parts on the board one by one and then resolving the issue that’s causing it to appear.
To turn off the orange light on your motherboard, make sure your RAM sticks are placed properly and the storage drive (SSD, HDD, or optimal drive) is working fine. Also, diagnose the power supply and ensure it has not fried out. Cleaning your entire PC with canned air is also a good way to get the PC back to work by removing debris.
ASUS motherboards tend to be different from the regular boards. When you see an orange light on an ASUS motherboard, it means the PSU connected to the motherboard is working fine and meeting the system’s power requirements. So, there’s nothing to worry about the orange light on an ASUS motherboard.
Final Words
An orange light on the motherboard could indicate a variety of issues, ranging from a simple problem like a loose connection to a more complex issue like a failing power supply.
However, with careful observation, proper troubleshooting, and timely intervention, you can identify and resolve the issue quickly and efficiently.
Until next time, cheers!
![Can You Use DDR3 RAM On a DDR4 Motherboard? [Guide for 2022]](https://motherboardtimes.com/wp-content/uploads/2021/11/can-you-use-ddr3-ram-on-a-ddr4-motherboard-1-768x432.png)

![Do Motherboards Come With Screws? [Definitive Guide]](https://motherboardtimes.com/wp-content/uploads/2021/11/do-motherboards-come-with-screws-768x432.jpg)
![Why is Motherboard Important? [All You Need to Know]](https://motherboardtimes.com/wp-content/uploads/2022/06/why-is-a-motherboard-important-768x432.png)
![Do Motherboards Have Bluetooth? [Detailed Guide]](https://motherboardtimes.com/wp-content/uploads/2022/03/does-motherboard-have-bluetooth-768x431.jpg)
![How Much is a New Motherboard in 2024? [Revealed With Data]](https://motherboardtimes.com/wp-content/uploads/2022/08/how-much-is-a-new-motherboard-768x432.png)
Rule of thumb #1:
Switch on your computer, and WAIT, WAIT A LOT, WAIT 5 to 10 minutes
Your computer will test your memory then come back on screen with a BIOS message.
If this doesn’t work THEN think about the advices on this page
Additional infos: I had this issue on a brand new PC just mounted, with an ASUS MB
Really thanks for your insights!