10 Easy Ways to Troubleshoot a Motherboard at Home


A repair shop isn’t the only solution for a bad motherboard. In fact, you can solve many motherboard problems at home, with little to no effort required. So, how to troubleshoot a motherboard?
You’ll find the most effective ways to do that, in this guide. For instance, we will cover:
- How to diagnose a motherboard.
- How to troubleshoot a motherboard.
- The most common motherboard problems and solutions.
- FAQs on motherboard diagnosis and troubleshooting.
That said, let’s dive in.
How to Troubleshoot a Motherboard?
Troubleshooting a motherboard doesn’t have to be hard. You don’t necessarily need to go to a repair shop. Instead, most of the motherboard problems are minor and can be easily fixed at home.
But in order to fix them, diagnosing the motherboard is also important. So, let’s look into the most important steps for motherboard diagnosis.
1. Check All the Cables
I know it’s boring and exhausting. But loose cables can cause the motherboard not to work properly. So, be sure to check each and every cable, whether be it the GPU power connector, computer power supply, or SSD power cable. Make sure all of them are properly placed and tighten up.
2. Make Sure the Hardware Parts are Placed Properly
The loose RAM, GPU, or other hardware parts on the motherboard can cause it to not work properly. The motherboard forms a connection between all the hardware components and doesn’t power up if any of those misbehaves. So, make sure all the hardware parts are placed properly, especially RAM sticks and storage.
3. Make Sure the Screws are Tighten Up
As mentioned, the motherboard is the backbone of your computer and if anything happens to any of its parts, the motherboard wouldn’t power up. In the case of loose screws, the same rule applies. The loose screws of the motherboard or other hardware parts could result in electrical damage — which is one of the common motherboard failure causes.
Moreover, if loose screws have already done something to your motherboard, read our guide on how to tell if a motherboard is dead to see if it is safe.
4. Swap the RAM Sticks for Motherboard Troubleshooting
If you haven’t found the problem yet, be sure to try this method. Swap the RAM sticks. The RAM is often causing problems to the motherboard and swapping the RAM sticks mostly fixes the problems.
But if it still doesn’t work, only let a single or two RAM sticks be placed on the motherboard and remove the others. If the PC powers up, you can install the remaining sticks back in. And if you find that these RAM sticks are what was causing the problem, you can clean their contacts (golden part) with a pencil eraser. It works well in most cases.
Furthermore, also read our guide on can you use DDR3 RAM on a DDR4 motherboard or not. It’ll show you exactly why you shouldn’t make such a mistake.
5. Try Out Another Power Supply
Does the issue still remain? How to be sure the power supply isn’t behind this problem? Well, as you guessed, try replacing the power supply. You can either swap it with a new one or with an old one. But the point to note is, make sure it has a suitable voltage for the computer’s needs and works fine. It could cause a malfunction otherwise.
6. Run a Power-On Self-Test (POST) for Diagnosis
A POST test can be effective to see if there’s a problem with your motherboard. However, not all the motherboards support it, only the modern ones do. If you want to test it on your board, follow the steps illustrated in the infographic below:


7. Try Onboard Speaker or Beep Code Testing for Motherboard Diagnosis
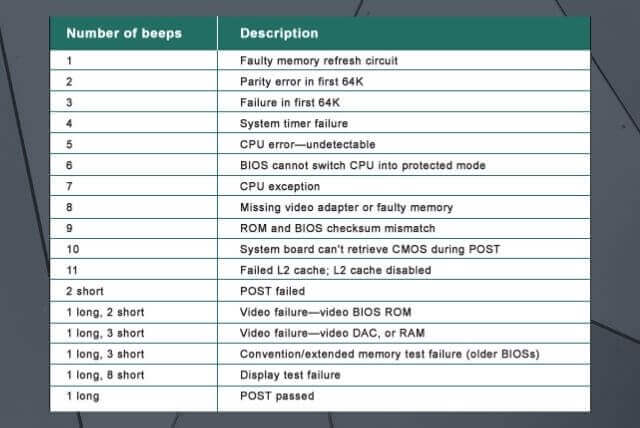
If you’re hearing about beep codes for the first time, well, they’re special codes presented to you through speaker beep sounds. They indicate the functionality of the motherboard and are an effective way to diagnose the motherboard.
If booting up your computer gives a long beep sound from the speaker, it means the motherboard is working fine. But if the sound is different, you can determine the problem with the motherboard by matching the sound with the table below:


8. Reset Your BIOS to Troubleshoot the Motherboard
BIOS refers to the software that works below the operating system on the computer. It is responsible for the hardware to start because the main operating system (like Windows or Mac) will only run if it works fine.
Corrupted or outdated BIOS can also lead to a bad motherboard. Here’s how you can reset your computer BIOS by simply removing and putting back the CMOS battery:
1. Power down your computer and remove all the power cables
2. Open up the PC case and remove the CMOS battery. Not sure what it looks like? Do some research and you will
3. Simply remove the battery and wait for a few minutes. Now, either replace it with a new battery (better option) or put back the current one
4. That’s it, when you turn on the computer, the BIOS will have been reset
Read HP’s guide on how to reset BIOS on Windows for further information.
9. Make Sure There’s No Overheating
One of the major reasons a computer automatically shuts down is overheating. If you feel that you’re going through the same and the motherboard is the cause, you might be wrong.
The overheating of hardware parts can also lead to this. It is because the motherboard is designed to prevent any hardware damage to take place. Therefore, it automatically shuts down your computer to avoid damage from extreme temperatures.
Here’s how you can prevent overheating:
- Clean the dust on fans
- Make sure the fans or the cooling system is operating fine
- Try running the computer with PC case open
- Undo any recent changes you may have made
- Maintain a good airflow in the computer
- Make sure nothing interferes with the air passageway
For detailed information, you can read Intel’s guide on overheating symptoms and troubleshooting. Furthermore, to ensure your motherboard is protected from dust or debris, read our guide on how to clean a motherboard.
10. Remove Unnecessary Devices
Connecting unknown or faulty devices to the computer can also result in the inadequate operation of the computer. So, try removing all the unnecessary devices from the computer and then start it, it may fix the issue.
Still No Luck Troubleshooting Your Motherboard? Consider a Repair Shop
If nothing works, it’s time to either go to a repair shop or purchase a new motherboard. If your motherboard was old and not worth fixing as it will be outdated, I would recommend purchasing a new one. But if it’s a new one, surely opt-in for the repair shop, it might help.
By the way, if you feel that your motherboard does light up but you’re unable to find a solution, you can write down your specific situation in the comments below and I’ll get back to you with a solution.
How to Check if the Motherboard is Faulty?
Below are the major symptoms that indicate a faulty motherboard:
Physical damage – If you see any burnt transistors on the motherboard or feel that the circuits are chipped, it means the board is physically damaged. Furthermore, if you feel the burning smell when operating the computer, it indicates that the motherboard is damaged.
Slow functions – A faulty motherboard can result in slow functioning. The motherboard is responsible for forming a connection between the hardware parts. If you feel that programs are taking long to respond or the mouse cursor is moving slower, it could be because of a damaged motherboard.
Freezes – If you feel that the computer freezes for a while after working fine, it is a negative sign. It shows that the motherboard is unable to form a proper connection between hardware parts and is suffering from damage.
Blue screen of death – The blue screen of death means the computer is at a risk. Some of the hardware parts are not working properly, due to which, the computer software can no longer operate. A faulty motherboard can also lead to this hazard. Here’s what it looks like:
If you find these indications in your motherboard, it means the motherboard is likely faulty. And how to troubleshoot a motherboard is exactly what this guide explains.
What causes the motherboard to fail?
The major reasons for a motherboard to fail are electrical spikes or low voltage. Furthermore, non-proper placement of hardware parts can also cause it to die. Overheating and incorrectly placed cables are some other reasons behind a motherboard failure.
Can you touch RAM with bare hands?
It’s okay to touch RAM with bare hands. But it’s recommended to prevent touching the golden parts of RAM, known as contacts. They are responsible for the connection of RAM to the motherboard and touching them could damage the RAM stick.
How to repair a motherboard with no power?
If your motherboard doesn’t power up nor gives any beep sound or LED blinking, it means the board is dead. In this condition, the way around is to go to a repair shop. Alternatively, you can get help from an expert or replace the motherboard.
Key Takeaways
How to troubleshoot a motherboard? What are the common motherboard problems and solutions? Here are the action steps:
- Check all the cables and make sure hardware parts are placed properly.
- Tight up the loose screws and try swapping the RAM sticks.
- If available, try out another power supply to see if the power supply was the problem.
- If your motherboard supports it, try running a POST test.
- Do beep code testing and reset your BIOS.
- Overheating is a common cause for motherboard issues, make sure no hardware part is overheating.
- Remove unnecessary devices from the computer and turn it back on, see if it works.
![How to Tell if My Motherboard is Dead [+ Infographic]](https://motherboardtimes.com/wp-content/uploads/2021/12/how-to-tell-if-a-motherboard-is-dead-768x432.jpg)

![Onboard Wi-Fi vs Wi-Fi Card vs Wi-Fi USB [SIMPLIFIED]](https://motherboardtimes.com/wp-content/uploads/2022/01/onboard-wifi-vs-wifi-card-vs-wifi-usb-2-768x432.png)
![Do Motherboards Come With Wi-Fi? [Detailed Guide]](https://motherboardtimes.com/wp-content/uploads/2022/01/do-motherboards-come-with-wifi-1-768x512.jpg)
![Does Motherboard Affect FPS? [Truth Revealed + Infographic]](https://motherboardtimes.com/wp-content/uploads/2021/12/does-motherboard-affect-fps-768x432.jpg)
![Do Motherboards Have Bluetooth? [Detailed Guide]](https://motherboardtimes.com/wp-content/uploads/2022/03/does-motherboard-have-bluetooth-768x431.jpg)
